Built-in Columns in JSON View Forms

SharePoint Online supports custom list view formatting with a funky little JSON DSL that is meant to allow customization without giving users full control over HTML or Javascript which is unsafe. This feature was added back in 2017.

The way it works, only displayed columns are allowed to be referenced in the custom JSON. Unfortunately, the feature owners never got around with supporting the “hidden” or “default” SharePoint columns like Created By or Last Modified. As a result, there is no way to show these columns at all in the “modern UI”. (As of 2024, this is still the case and it boggles the mind).

At work we have these “hack day”-style events that we call FHL (Fix. Hack. Learn.) where we are given some time to work on knocking out some of the little problems that get in the way of work, annoy us, QOL improvements, etc. This bug was bothering me because we are using some SharePoint lists internally to track stuff and we often want to see who created an item in the list, but there was no way to show it without some crazy hacks. (Dear feature owners: using a workflow to copy a default field into a totally redundant one on the same item is not my idea of a workaround.)

Long story short, I added hacky support for some of the default columns so they can be used in custom JSON views. The following columns should be able to be referenced now in SharePoint Online.

  • $Author — The “Created by” user. This a user object, e.g. [$Author.title] or [$Author.email]
  • $Editor — The “Modified by” user.
  • $Created — The date the item was created.
  • $Modified — The date the item was last modified.
  • $ID — The list item id.
  • $_UIVersionString — The “pretty” string for the current item version.

Here’s the most basic demonstration of adding a custom footer to the list view form for a document.

{
    "elmType": "div",
    "style": {
        "display": "block"
    },
    "children": [
        {
            "elmType": "div",
            "txtContent": "[$Author.title]"
        },
        {
            "elmType": "div",
            "txtContent": "[$Created]"
        },
        {
            "elmType": "div",
            "txtContent": "[$Editor.title]"
        },
        {
            "elmType": "div",
            "txtContent": "[$Modified]"
        },
        {
            "elmType": "div",
            "txtContent": "[$ID]"
        },
        {
            "elmType": "div",
            "txtContent": "[$_UIVersionString]"
        }
    ]
}

Here are a few posts from others online who have been struggling with this. Hopefully they run across this post and get unblocked.

ETW and Async in .NET

I ran into this problem at work and wanted to capture the findings for future me.

ETW uses the ActivityId field on the TEB to track an activity. This gets logged with the ETW events.

When adding async Tasks to the mix, Tasks have an abstraction on the execution context that is per Task. Tasks may run on multiple different threads and so it’s possible that a Task gets hooked up to a thread that already has an activityId set. This messes up logging.

AsyncLocal provides a way to “flow” an ambient value across multiple Tasks as part of a logical operation. This can be used to track activityId on Tasks, but the trick is getting it pushed down onto the native thread.

AsyncLocal has a constructor argument that is a callback that is executed when the value changes. Values are always refreshed from empty when a Task is assigned to a thread. This provides a place where the activityId can be flowed down to the executing thread so that ETW logging works.

See ActivityTracker.cs on ReferenceSource to see how this works in .NET Framework.

Sonicare UART

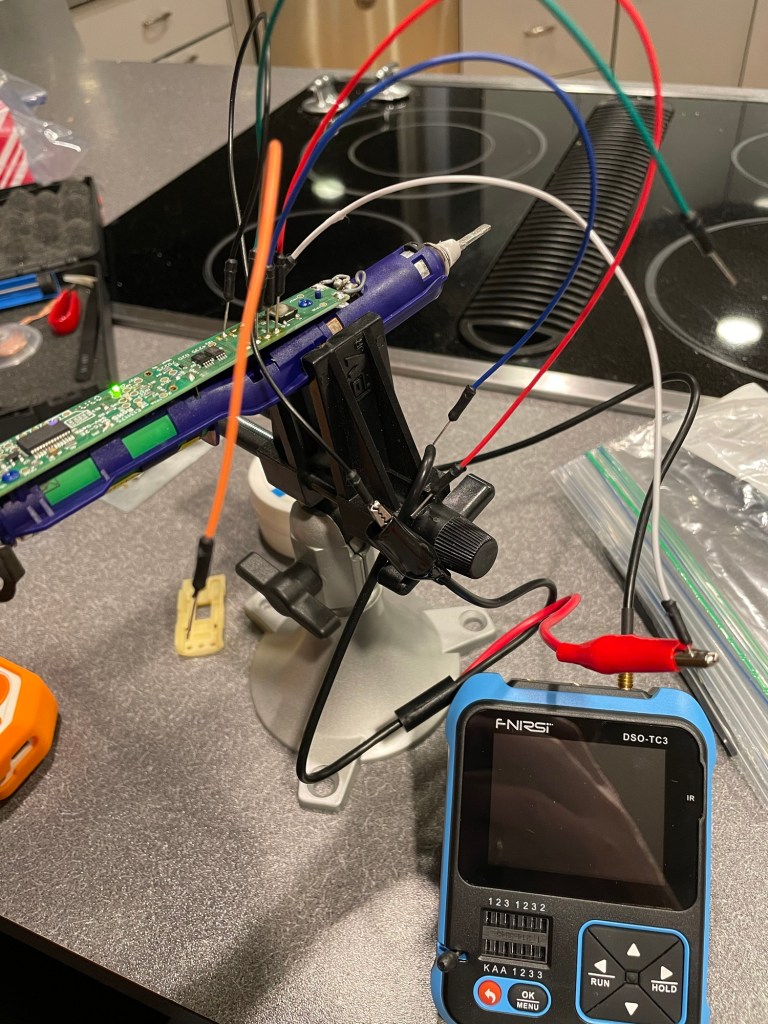
The seal on my toothbrush failed and the driver isn’t working well anymore. I took it apart to see if I could fix it, but the driver is all corroded and is a model that’s not serviceable. Boo.

I figured I’d scavenge the battery. While I was looking at it, I noticed that there are UART and I2C pads. Interesting. I soldered on some wires on and tried the Flipper Zero UART console. Sadly, nothing lit up.

I wonder what a toothbrush has to say…
Maybe the dorkiest thing I did over break?

I hooked up my little oscilloscope and checked all the pins. The UART pins seem to be pulled high and the I2C pins seemed to float. There was no clock or anything that looked like signal. Strangely, the UART pin voltage was 4.7v.

I could mess around with it some more, but I think it’s probably just there for programming the chip though the board at the factory.

Dirty-PocketChip-wave M8

Before I decided to buy the M8, I tried it “headless” with a Teensy for a while to see if I could figure it out. It worked well enough, but the whole point of the M8 is that it’s portable and fun. I thought I’d try to get it running on my PocketChip. It worked and it wasn’t even that bad to use. If I really wanted to I could have stuffed the Teensy into the Chip’s case and had a pretty decent portable experience. I even made a song on it.

I wrote a short readme and have the source on my GitHub. There’s also a pre-built binary if you have a Teensy and a PocketChip and want to give it a try.

Setting a Person field in SharePoint

This shouldn’t be this hard. The SharePoint team really needs to work on the programming model. This web API is bad bad.

For “reasons” I found myself needing to update a SharePoint list item to set the value of a Person field. It turns out that this is insanely annoying because what the ListItem API expects is the resolved User Id (it’s some rando number that’s assigned to the user when they access the site for the first time.) I’m working in a PowerAutomate flow and unfortunately that’s not a value that comes along with a user’s object. That would be too helpful.

If you try to use the Claims string to set the PersonFieldStringId field in a MERGE, it just doesn’t work. You get some terrible error message like Bad Gateway or something equally useless. Also, if you try to set through the navigation property like PersonField: { "Claims": ... }, that will succeed, but not actually work.

After being very frustrated and increasingly annoyed, I finally found someone who said to use the validateUpdateListItem method on the item. It worked. Apparently, this method “Validates and sets the values of the specified collection of fields for the list item.”

In case you find yourself on this site, wondering how this can all be so unnecessarily complicated, here’s the request you want to make.

URI: https://tenant.sharepoint.com/sites/MySite/_api/web/lists/GetByTitle('My List Name')/items(1234)/validateUpdateListItem
Method: POST
Headers: Content-Type=application/json;odata=verbose
Body:
{
"formValues": [
{
"FieldName": "Your_x0020_Field_x0020_Name",
"FieldValue": "[{'Key':'i:0#.f|membership|user@domain.com'}]"
}
]
}

Radio Adventures

After my year of music I got a Flipper Zero kind of on a whim. I didn’t know much about it but it was kind of fun trying to catch signals. The biggest problem was that it was limited to digital signals inherently and the SubGHz bands it supports are kind of uninteresting unless you’re into hacking. I liked the portability and the slick case, but generally it doesn’t really fit into any use case. I wrote a little IR scope that lets you visualize an IR signal. That was kind of fun.

Working on the PortaPack firmware

Then I was introduced to SDR and more precisely the PortaPack built on HackRF. That’s the flexibility of a fairly powerful, half-duplex SDR, in a portable device. Even better is that it has a great open source community. The Mayhem project was a lot of fun to work on. Lots of interesting problems to solve, bugs to fix. The community has some great people too. It’s all C++ so it was nice to have a place to continue to practice my coding.

I spent hours and hours and days and weeks working on the project, but then, as all my interests do, I found something else to focus on. In this case it was the Dirtywave M8. Does that mean it’s back to making music? Maybe. That and a renewed focus on home improvement projects…

Long time; No post

I just noticed my last post was in 2021. What have I been doing lately? In the spring of 2022 I got into making music. I started out with a Teenage Engineering P.O. 20 and made a few songs. Liked that so I got a P.O. 133 which is a little sampler. That was fun, but the sound quality was meh. Then I bought a Novation Circuit Rhythm. That thing was awesome, but working with samples was kind of limiting so I wanted a synthesizer. So I got a Modal Skulpt which was fun. Then I wanted more power so I got an Arturia MicroFreak. I wanted to like that more than I did, so I sold that. I got a Novation Circuit Tracks which was great, but working with the synths was a pain in the butt because it was all done on the computer. Then I wanted even more synth power so I got an ASM Hydrasynth Explorer. That thing is epic. Love it. The Novations weren’t cutting it so I sold them both and got an MPC One, which is super powerful, but it has some warts (that piano roll is painful.) Finally, I ended up with a Dirtywave M8 which I strangely love. It’s so tedious to use, but I love how small and portable it is and the synth engine is actually pretty nice sounding.

Dirtywave M8

Along the way I dabbled in various software. Sunrizer Synth is really great. Koala Sampler is also fantastic and is a great replacement for the P.O. 133 at a fraction of the cost. It’s 100% worth paying for the full version. I also dabbled with Synthesizer V and AI singing. Super cool and I need to open that app up again (it was pretty pricey.)

Check out my music on SoundCloud.

2023 was the year of radio. It started with a Flipper Zero and ended up being a maintainer on the PortaPack Mayhem project. More on that in another post.

3D Printed Keyboard for PocketChip

Clicky button goodness

I used this face plate keyboard https://www.thingiverse.com/thing:1998427

I printed the plate with clear PLA and 36% infill. It was too much infill and it got rough around the display, still usable. I’d probably reprint with 25%.

I used the PLA version of the buttons with 25% infill. I also made a small modification to the bridge that connects the escape button to the d-pad per a suggestion on the author’s GitLab account. The bridge connects to the up arrow instead of the left arrow. Not sure that it helped much because the left arrow still doesn’t feel as clicky as the rest.

You have to be super careful pulling the buttons off the printer plate to avoid breaking the bridges between the buttons. I broke two but used the tip of a hot glue gun to melt them back together.

The buttons! What do they do?

For the label, I scanned the face plate and placed all the letters in PhotoShop. It took some trial and error, but I ended up with a font and size that looks ok. I laser printed the label on removable vinyl then cut it out on the Cricut. It fit perfectly.

Cut cut cut

Here’s my edited keyboard button model and my keyboard label files. WordPress hates zip files so tar.gz it is.

300DPI (4.217″ wide)

Connecting 8BitDo Zero to PocketChip

Well this was way more involved than I had expected.

I wanted to hook up a bluetooth gamepad to my PocketChip so I could play PICO-8 games a little more ergonomically. I had a few controllers laying around, but one seemed perfect for the job: the 8BitDo Zero. It’s really small and it fits the “pocket” ethos of the PocketChip. The only downside is that I’ve never actually gotten the damn thing to work correctly on any system I’ve connected it to.

8BitDo Zero

It has a few different modes for different systems. One is a keyboard emulation which just “types” letters when you push the buttons. This is the easiest mode to get working and it works on any device that will accept a bluetooth keyboard. The downside is that you have to remap all the key bindings in the programs you’re trying to control. PICO-8 doesn’t have control profiles or anything that would make this a friendly option.

It also has a gamepad mode. That sounds promising! First thing you have to do is get it connected. Luckily I had just spent a ton of time trying to get my bluetooth speaker connected so I was familiar with bluetoothctl. power on; agent on; scan on; pair; trust; connect.

Out of the gate it looked promising because the d-pad worked like the arrow keys. I was able to navigate SPLORE, but sadly the other buttons didn’t work. Looking at the PICO-8 log, I saw that there were no joysticks discovered. Well why not?

apt install jstest-gtk
Running jstest I was able to see the buttons were actually working but that was on the `/dev/input/js0′ device. Also, the d-pad wasn’t actually getting interpreted as gamepad buttons – instead normal keyboard scan code were being sent. Sigh. After a bunch of reading, it turns out that SDL2 no longer supports the joystick devices, but instead looks at event devices.

There’s a known problem with SDL on Linux where the udev devices aren’t readable by normal users. The fix is to add add your account to the input group. That wasn’t the case on the PocketChip. The chip user was already in the input group.

I ran across some forum posts suggesting that the controller mapping may need to be updated. The “normal” way to do this is to use a tool that is only released in binary form and, sadly, there wasn’t an ARM build for the PocketChip. One user suggested building the controllermap tool from source on the device. Sounded promising, but it also sounded like a lot of typing for that tiny keyboard.

apt install openssh-server
In order to make it easier to futz around with building on the PocketChip I installed ssh server so I could at least work on a real laptop instead of the tiny screen with the tiny keyboard. Then I followed the instructions on the forum post … and it didn’t build. It wouldn’t build because configure wanted some sdl_config tool in the path… and I didn’t have that. Ok…

apt install libsdl-dev
Don’t do this. You don’t need to. I didn’t need to either, but I didn’t know that yet. That solved my problem and I was able to configure the tests and build the controllermap tool. Then I ran it… “SDL was built without joystick support.” Wat.

Well.. I already had the SDL2 sources downloaded so might as well build the whole thing. It took about 20 minutes and when it was done, I had a shiny new SDL2 from source and was able to build controllermap. This time when I ran it I got a useful error: “ERROR: Couldn’t initialize SDL: No available video device.” I guess that’s progress. Set up X forwarding… run again… “There are 0 joysticks available.” Progress?

More searching. I’m in the “3 results” part of Google now but I found a post which lead me to this udev rules file on GitHub. After a little reading about udev I gave it a shot and added this rule.

# 8Bitdo ZERO
SUBSYSTEM=="input", ATTRS{name}=="8Bitdo Zero GamePad", MODE="0666", ENV{ID_INPUT_JOYSTICK}="1"

That actually worked…ish. It worked well enough that the controllermap program at least could find gamepad. Unfortunately I wasn’t able to complete the mapping wizard because the d-pad still wasn’t working. Looking at that rules file, the author had linked to the SDL2 readme and labelled it “Useful reading“. In the last section it introduced a few new commands to try: evtest and udevadm.

Running evtest shows you a list of the event devices along with their friendly names. I picked the 8BitDo and it started logging the buttons that were pushed. Everything made sense except the d-pad which was still emitting keyboard scan codes. So I checked out the other command. sudo udevadm info --query=all --name=input/eventXX, using the event device number from evtest I got this.

P: /devices/platform/soc@01c00000/1c28c00.serial/tty/ttyS1/hci0/hci0:5/0005:05
A0:3232.0002/input/input4/event3
N: input/event3
E: BACKSPACE=guess
E: DEVNAME=/dev/input/event3
E: DEVPATH=/devices/platform/soc@01c00000/1c28c00.serial/tty/ttyS1/hci0/hci0:5
/0005:05A0:3232.0002/input/input4/event3
E: ID_INPUT=1
E: ID_INPUT_JOYSTICK=1
E: ID_INPUT_KEY=1
E: ID_INPUT_KEYBOARD=1
E: MAJOR=13
E: MINOR=67
E: SUBSYSTEM=input
E: USEC_INITIALIZED=2417702041
E: XKBLAYOUT=us
E: XKBMODEL=pc105

Hmm… INPUT_KEYBOARD doesn’t sound right. At this point I was getting frustrated so I hooked up a SteelSeries Nimbus and tried with that… after burning 30 minutes on that hot mess (something was borked with the d-pad), I tried with the Nintendo Pro controller and worked just fine. I was able to run controllermap and generate the mapping, paste it into PICO-8’s sdl_controllers.txt file and for the first time actually see that this is possible.

Looking at the the udevadm output for the Nintendo Pro controller I didn’t see anything about a ID_INPUT_KEYBOARD so I wondered if I could remove that from the 8BitDo with the udev rule. Much reading later…

# 8Bitdo ZERO
SUBSYSTEM=="input", ATTRS{name}=="8Bitdo Zero GamePad", MODE="0666", ENV{ID_INPUT_JOYSTICK}="1", ENV{ID_INPUT_KEY}="0", ENV{ID_INPUT_KEYBOARD}="0"

I was hoping that if I turned off INPUT_KEYBOARD it would keep the d-pad from sending keyboard events. I wrote the rule to /etc/udev/rules.d/99-8bitdo.rules and reloaded the rules udevadm control --reload-rules. Then the rules needed to be triggered again so I disconnected and reconnected the gamepad. This time when I ran evtest I got sane looking events from the d-pad! Next step was to build the controllermap. Moment of truth! controllermap 0 > ~/controls.txt Hey it worked! I pasted the output controller map into PICO-8’s mapping list and booted up SPLORE and it worked! All the buttons “just worked.”

So I’m really happy. This is the first time my little 8BitDo Zero has ever actually worked correctly in all the years I’ve had it. Now I can play my PICO-8 games with a nicer controller and what a difference it makes for some of the platformers that decided that “up arrow” should be jump (mumble mumble)…

If you’re one of the very few people in the world who is trying to hook up a 8BitDo to a PocketChip (or Pi) I hope this helps. Also, hopefully I can save you a step and you can just use my PocketChip build of controllermap from the SDL2 tests.

  1. Add the udev rule above to /etc/udev/rules.d/99-8bitdo.rules
  2. Connect the gamepad with bluetoothctl
  3. Run controllermap 0 > map.txt
  4. Add the result to ~/.lexaloffle/pico-8/sdl_controllers.txt
  5. Run PICO-8